How to Create a New Targeted Marketing Promotion Campaign

This article covers how to create a new targeted marketing campaign in Service Intelligence.
STEP-BY-STEP FOR THE CLOUD-BASED VERSION OF THE APPLICATION
Left click Start New Campaign from column 1.
You will see Marketing Campaign Gallery on the main page, which is a list of available templates and their main images. These are broken down by service category, which is determined by your shop management system. If you click an image, you will see on the right hand side of the screen Template Information. This gives you a sample of what the campaign will look like.
Left click Create. This will open a dialogue box with all the settings for the campaign.
The dialogue box contains a list of settings that you can edit for the campaign . In the following screenshots, each number corresponds to a field in the dialogue box. These fields are (from 1 to 31):
1) Location: this refers to the origin of the campaign. This is the shop name on the promotion. If your shop has multiple locations, the drop-down menu will allow you to pick one of them.
2) Campaign Type: this let's you choose whether your campaign is either for targeted marketing or customer retention.
3) Service: this let's you pick which service the promotion targets. The list of services comes from your shop management system.
4) Filter Target Group: this let's you choose which group of customers you want to send promotions to. If you haven't made any filters yet, your drop-down menu for that field will be blank. The Add Filter button underneath the menu let's you add a new filter to the list.
5) Email: if checked yes, this will send the promotion to the customer by email.
6) Postcard: if checked yes, this will send the promotion to the customer by postcard.
7) Text: if checked yes, this will send the promotion to the customer by text.
8) Campaign Type: this let's you choose either scheduled or daily. If you choose scheduled, this campaign will run on a schedule, where every month everyone due for the service on that day is sent a notice. If you choose daily, this campaign instead will run every day and send a notice to customers due that day.
9) Execute Time: the time of day the promotions are sent out.
10) Start Date: the date when promotions are first sent out.
11) Ends: this is when the campaign ends. This can be never, after a certain number of occurrences, or on a specific date.
12) Recurrence Type: this is the amount of time between each promotion sent out.
13) Recur Every: how often promotions are sent out.
14) Summary: this describes when and how promotions are sent out.
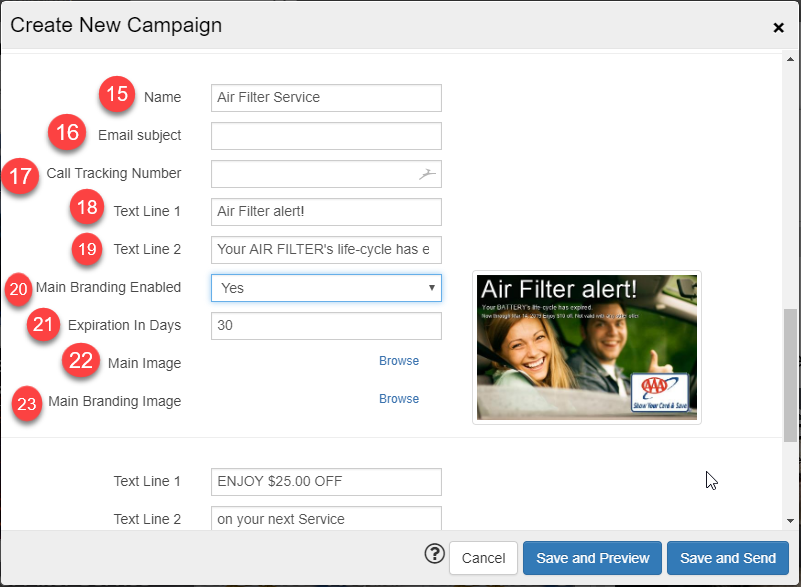
15) Name: this is the name of the campaign.
16) Email Subject: this is what is filled into the subject line of the email, if sending promotions by email has been enabled.
17) Call Tracking Number: recipients of this particular campaign get a different number from the one associated with the shop.
15) Name: this is the name of the campaign.
16) Email Subject: this is what is filled into the subject line of the email, if sending promotions by email has been enabled.
17) Call Tracking Number: recipients of this particular campaign get a different number from the one associated with the shop.
18) Text Line 1: this is the large text on the main image.
19) Text Line 2: this is the small text on the main image.
20) Main Branding Enabled: if checked yes, this will lay an image of a brand of your choosing on top of the main image.
21) Expiration in Days: this is how long until the campaign expires.
20) Main Branding Enabled: if checked yes, this will lay an image of a brand of your choosing on top of the main image.
21) Expiration in Days: this is how long until the campaign expires.
22) Main Image: this is the main image of the promotion. You click browse to choose an image to use.
23) Main Branding Image: this is the image of the brand laid on top of the main image (assuming you chose yes for main branding enabled). You must click browse to choose an image to use.
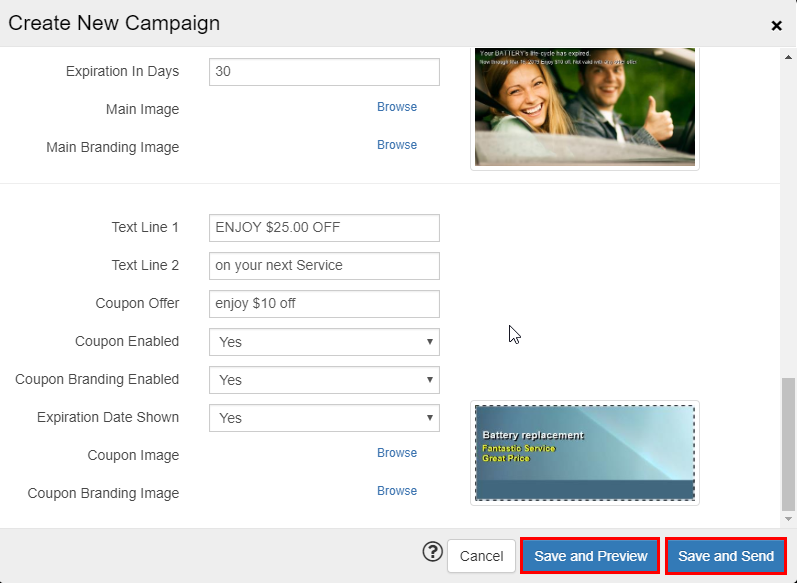
24) Text Line 1: the large text on the coupon image.
25) Text Line 2: the small text on the coupon image.
26) Coupon Offer: the amount the coupon is taking off
27) Coupon Enabled: whether this promotion comes with a coupon.
28) Coupon Branding Enabled: if checked yes, this will lay a brand image on top of the coupon image
27) Coupon Enabled: whether this promotion comes with a coupon.
28) Coupon Branding Enabled: if checked yes, this will lay a brand image on top of the coupon image
29) Expiration Date Shown: if checked yes, this will show when the coupon expires
30) Coupon Image: the image for the coupon
31) Coupon Branding Image: the branding image laid on top of the coupon image.
30) Coupon Image: the image for the coupon
31) Coupon Branding Image: the branding image laid on top of the coupon image.
When you are done, you can can click Save and Preview to save your campaign and start it later. Alternatively, you can click Save and Send to start your campaign immediately.
STEP-BY-STEP FOR THE DESKTOP VERSION OF THE APPLICATION
To create a targeted marketing campaign, you will need to first left click Targeted Marketing Promotions in the lower left corner of the application.When you click the button, the column will change to what you see in the red box. This contains the settings you can edit for the campaign.
Under Select Targeted Service, click the down arrow on the drop-down menu and select the service category you want to target. In this example it's Oil Service-Regular. This list comes from the service categories you have in Service Intelligence, and may not contain the same services you see in this picture.
Once you choose your service category, below will be a list of customers. Service Intelligence searches through the vehicles in your database for customers who have come to your shop in the past to have the service performed.
Customer names that are grayed out indicate that you do not have an email address from them.
In the red box there are two check boxes. The top one, Include if Due in X days allows you to add customers who will be due for service a certain number of days in the future. The bottom one, Include if No History, if checked will included customers who have no history of the targeted service performed.
The Change Filters button allows you to narrow down the customers you want to send promotions to. Instead of sending promotions to everyone with a history of getting an oil change from your shop, you can instead narrow them down to a smaller group through filters.
When you choose Change Filters it will open a window called Selection Filter. Selection Filter shows you the different ways you can narrow down the group of customers. The red box is highlighting the filters related to Customer Type. The filter Number of Service Visits includes customers who have visited at least 2 times but no more than 25. Number of vehicles in Family/Fleet refers to customers who own from 0 to 5 cars. Finally, Months Elapsed Since Last Visit refers to customers who have visited from 1 to 3 months ago. The minimum and maximum values of the filters can be edited to be whatever you want.
Next is Zip Code Selection. The check box Include Zip Code will allow you to include customers who have specific zip codes, and you can choose which from the box to its right. Exclude Zip Codes will keep customers with certain zip codes out of the list, and you can also choose which to exclude from the box to its right.
Vehicle Filters contains filters pertaining to, as you would expect, vehicles. There are a two sub-groups, Vehicle Makes and Vehicle Models, within this group.
The Vehicle Estimated Odometer will show only vehicles that have estimated odometers within a certain range. Months Elapsed Since Las Srvc will show only vehicles that have come to the shop within a range of time (for example, vehicles that have come in four months to six months ago).
Under Vehicle Makes you have the choice to either include or exclude certain makes of vehicles from the list. Select from the box to the right of Include Selected or Exclude Selected to pick which makes you want included/excluded.
Vehicle Models let's you either exclude or include certain models of vehicles in your list. The box to the right let's you pick which models to include/exclude.
Year of Manufacturer let's you include only vehicles that have been manufactured within a range of years. In this example, all cars manufactured from 1980 to 2010.
Once you have finished choosing your filters, click OK to apply them.
The filters will allow you to target your campaign at a much more specific group of customers. Once you are done, you can move on to the next step by pressing Next.
The Offer tab shows you what the campaign will look like on the main page and allows you to customize how it looks under Customize Promotion in the column.
From top to bottom these fields are:
1) Line 1 Text edits the large text.
2) Line 2 Text edits the small text.
3) Email Subject edits the email's subject line.
3) Email Subject edits the email's subject line.
4) Show Expiration in X edits how many days until the promotion expires (now through mm/dd/yyyy).
5) Use Custom Coupon, if checked, will include a coupon that you can customize with (6) and (7).
6) Offer edits the the coupon offer on the coupon and Line 1 Coupon Text edits the first line of text on the coupon.
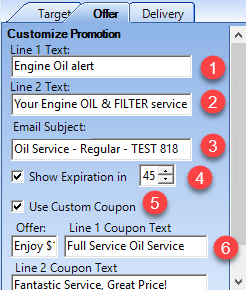
7) Line 2 Coupon Text edits the second line of text.
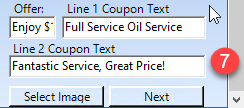
Once you have finished customizing your promotion, click Next to get to the last tab, Delivery.
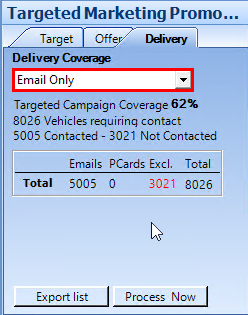
The drop-down menu under Delivery Coverage will let you choose how you want to send the promotion. Email Only sends an email to each customer while Postcard Only sends a postcard to each instead. Email and Postcard sends both to each customer, and Email or Postcard will only send postcards to customers who do not have their email addresses on your record.
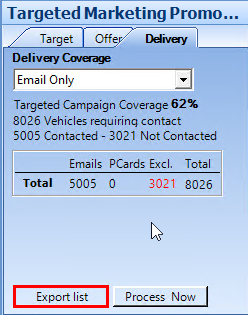
The Export List button is for when you want to export a a CSV file of the customer list. This is in case you want it, and not a necessary step in starting a campaign.
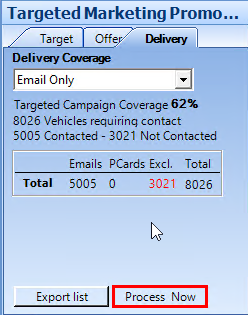
When you are ready to start the campaign and send out promotions, click Process Now.
5) Use Custom Coupon, if checked, will include a coupon that you can customize with (6) and (7).
6) Offer edits the the coupon offer on the coupon and Line 1 Coupon Text edits the first line of text on the coupon.
7) Line 2 Coupon Text edits the second line of text.
Once you have finished customizing your promotion, click Next to get to the last tab, Delivery.
The drop-down menu under Delivery Coverage will let you choose how you want to send the promotion. Email Only sends an email to each customer while Postcard Only sends a postcard to each instead. Email and Postcard sends both to each customer, and Email or Postcard will only send postcards to customers who do not have their email addresses on your record.
The Export List button is for when you want to export a a CSV file of the customer list. This is in case you want it, and not a necessary step in starting a campaign.
When you are ready to start the campaign and send out promotions, click Process Now.
Need more help?
You can always ask an expert at the eAutoclub.com Support Desk, give us a call on out support number (310) 984-3501 xt 4, or suggest a new feature or improvement by emailing us at support@eAutoclub.com.
Related Articles
How to Modify a Targeted Marketing Promotion Campaign's Text Element
This article explains how to modify the text of a targeted marketing promotion campaign. STEP-BY-STEP FOR THE CLOUD-BASED APPLICATION Left click CRM & Marketing in column 1. Click the targeted marketing campaign you want to edit from the list in CRM ...How to Delete a Targeted Marketing Promotion Campaign
This article explains how to delete any marketing campaign for Service Intel. It's important to note that while this tutorial specifically deletes the Thank You email campaign, you can use these steps to delete any of the campaigns in SI. Navigate ...How to Preview a Targeted Marketing Campaign
This article explains how to see the preview of a targeted marketing campaign for email, postcard, and text message. STEP-BY-STEP FOR THE CLOUD-BASED APPLICATION Left click CRM & Marketing from column 1. Click the name of the campaign whose previews ...How to Clone a Targeted Marketing Campaign
This article explains how to add or clone any marketing campaign for Service Intel. It's important to note that while this tutorial specifically clones and adds the Thank You campaign, you can use these steps to clone/add any marketing in SI. ...How to Modify CRM & Targeted Marketing Campaign Images
This article explains how to modify the images in CRM and targeted marketing modules. STEP-BY-STEP FOR THE CLOUD-BASED VERSION OF THE APPLICATION Left click CRM & Marketing. Click the pencil icon of the campaign you want to modify images for. In the ...