How to Modify a Targeted Marketing Promotion Campaign's Text Element

This article explains how to modify the text of a targeted marketing promotion campaign.
STEP-BY-STEP FOR THE CLOUD-BASED APPLICATION
Left click CRM & Marketing in column 1.
Click the targeted marketing campaign you want to edit from the list in CRM & Marketing Control Panel.
The main page will have opened to the Target List tab. Click Edit Campaign.
In the images below, you will see how the numbers in the first image are repeated in the the following two images. This shows how the settings correspond to the text in the preview. If you make a change in the settings, these changes will appear in the preview.
STEP-BY-STEP FOR THE DESKTOP APPLICATION
Left click the Targeted Marketing Promotions bar in the lower left.
From the drop-down menu under Select Targeted Service, choose the service whose campaign you want to edit.
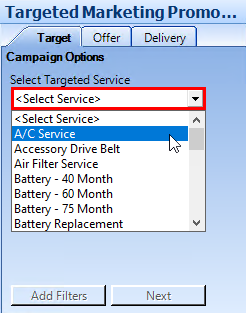
Left click the Offer tab to open the campaign settings.
You will see in (1) the settings you can customize for the promotion and in (2) a preview of what the promotion will look like.
In the first image below are the preview settings, with the text-related settings numbered. Changes done in these settings will change the text that appears in the preview. The numbers indicate what on the preview the setting changes.
Need more help?
You can always ask an expert at the eAutoclub.com Support Desk, give us a call on out support number (310) 984-3501 xt 4, or suggest a new feature or improvement by emailing us at support@eAutoclub.com.