How to Use the Add Record Tool

This article explains how to add a new record to Service Intelligence for customers who have received service from outside your shop.
STEP-BY-STEP FOR THE CLOUD-BASED VERSION OF THE APPLICATION
Left click Vehicles from column 1.
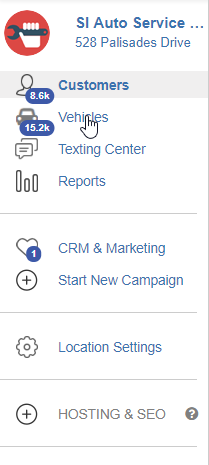
In the search bar, type in the name of the customer whose vehicle you want to add a record to.
Click the name of the customer to see their vehicles.
A progress report of the first vehicle belonging to that customer will be on the main page. At the top right corner of the page you will see the Add Record button. Click that button to open a dialogue box.
You will see in the dialogue box eight different fields. These are:
1) Service, which lets you pick the record's service category.
2) Odometer, which lets you type in the miles at the time this service was performed.
3) Date, which lets you put in the date of when the service was performed if you do not fill in Odometer.
4) Notes, which, as the name implies, lets you write a note for the record.
The following fields (5), (6), (7), and (8) pertain to the parts and labor associated with the service.
The following fields (5), (6), (7), and (8) pertain to the parts and labor associated with the service.
5) Parts Quantity, which is how many parts were used
6) Parts Total Cost, which is how much the parts cost.
7) Labor Hours, which is how many hours of labor were used.
8) Labor Total Cost, which is how much the labor cost.
Ordinarily, you can leave these fields at zero but if the service has filter requirements
(a minimum of parts and labor needed for it to count as a service), then you can put in the necessary numbers.
If you click the down arrow in the bar next to Service you will be given a drop-down menu with the service categories in SI you can choose from.
Pick the service you want to add a record for and fill in the relevant details in the parameters.
Once you do this, you can click the Save button and add the record to the vehicle's history.
STEP-BY-STEP FOR THE DESKTOP VERSION OF THE APPLICATION
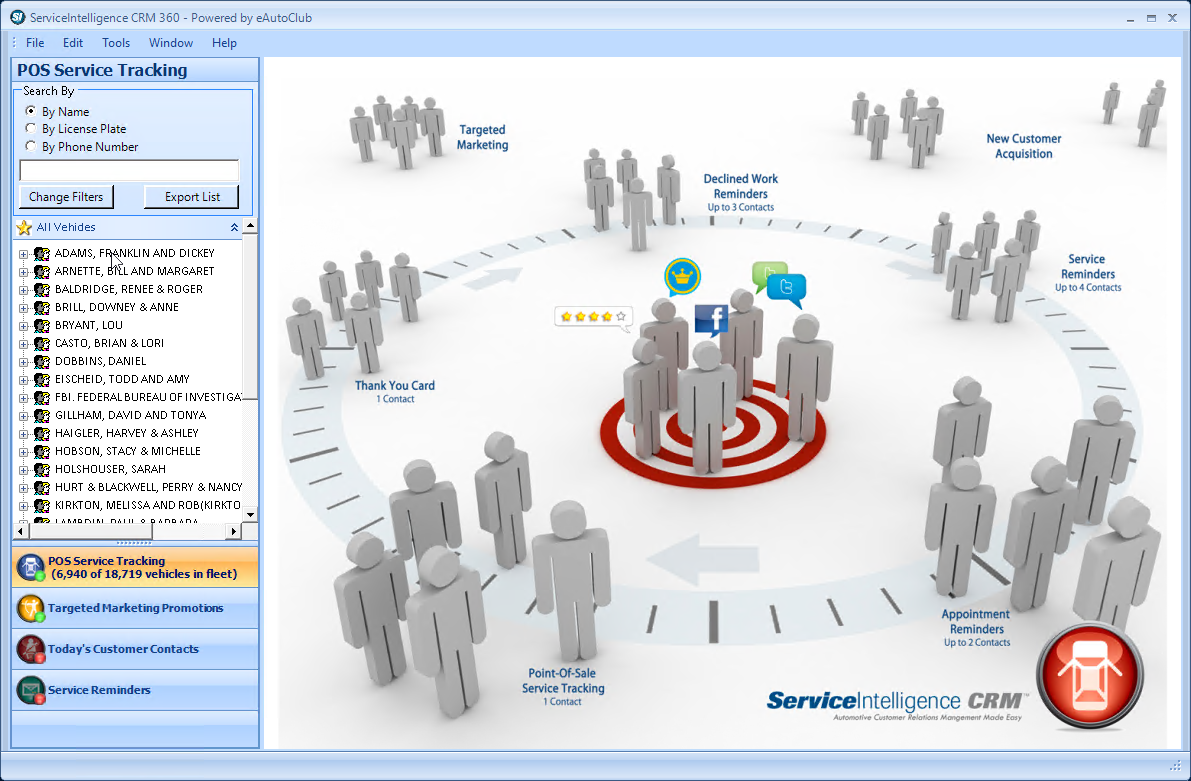
Left click the name of the customer whose vehicle you want to add a record to. It will open the summary for the first vehicle the customer owns. If you need to add a record to a different vehicle than the one SI automatically opens, click the name of the vehicle below the customer's name.
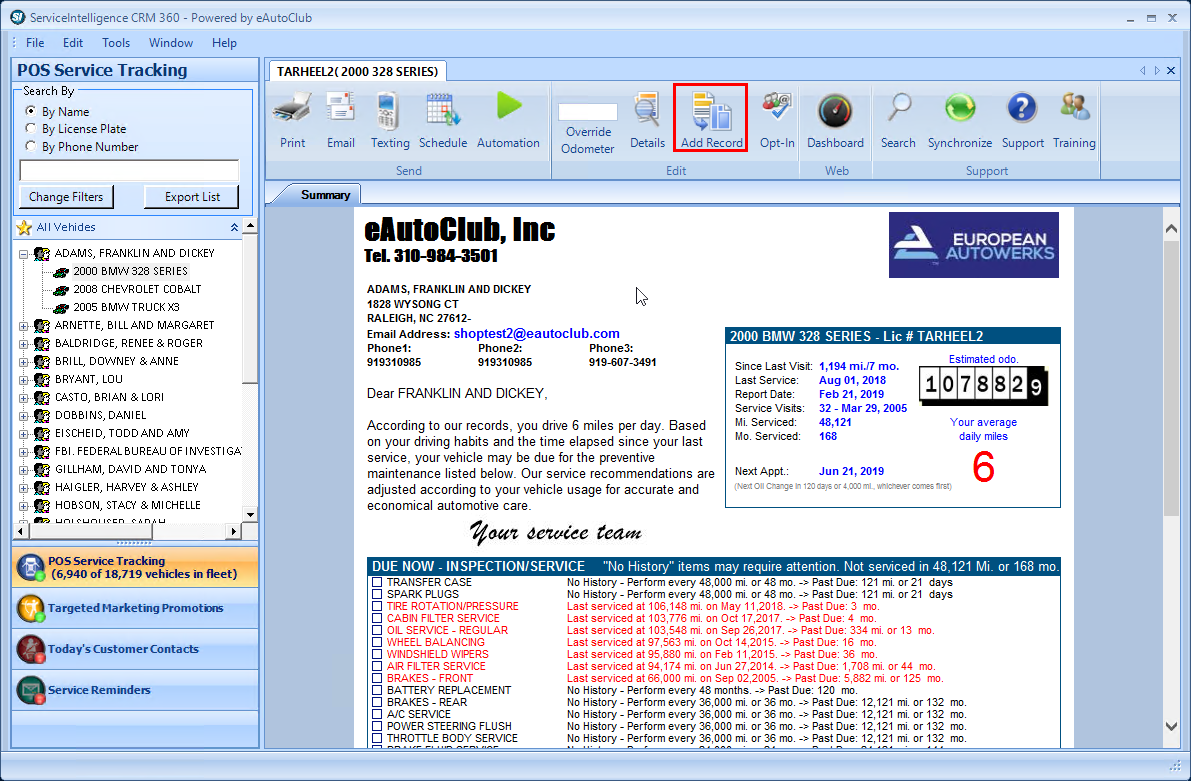
Click the Add Record icon at the top. This will open a dialogue box where you can put in the details for the record you are adding.
This is what the box looks like.
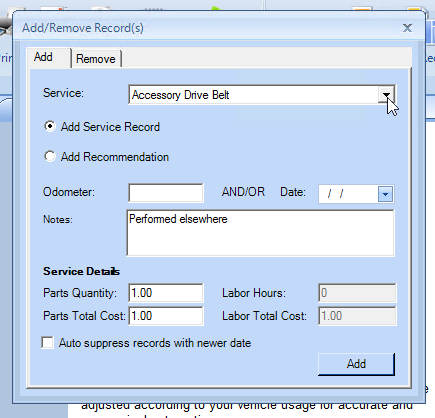
The fields you can edit are:
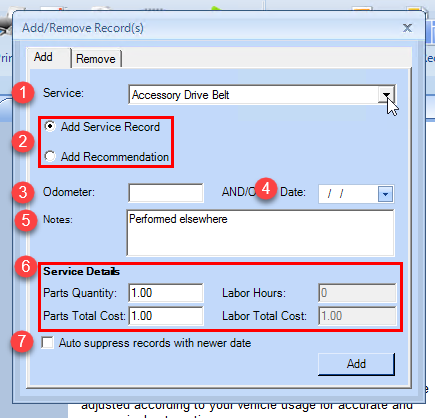
1) Service, which lets you choose which service was performed.
2) Add Service Record or Add Recommendation, which lets you choose between adding a record or adding a recommendation. Since you are adding a record, leave as is.
3) Odometer, which is the odometer reading of the vehicle when the service was done
4) Date, which is the date of when the service was performed.
Click the Add Record icon at the top. This will open a dialogue box where you can put in the details for the record you are adding.
This is what the box looks like.
The fields you can edit are:
1) Service, which lets you choose which service was performed.
2) Add Service Record or Add Recommendation, which lets you choose between adding a record or adding a recommendation. Since you are adding a record, leave as is.
3) Odometer, which is the odometer reading of the vehicle when the service was done
4) Date, which is the date of when the service was performed.
5) Notes, for when you want to add a note about the service performed.
6) Service Details, which includes: Parts Quantity, (how many parts were used), Parts Total Cost, (how much the parts cost), Labor Hours, (how many hours of labor were used), and Labor Total Cost (how much the labor cost.) Ordinarily, you can leave these fields at zero but if the service has filter requirements (a minimum of parts and labor needed for it to count as a service), then you can put in the necessary numbers.
7) Auto suppress records with newer date, which lets you suppress the latest record for a service and instead makes the new record the newest one.
Once you have filled in all the relevant details, click add to add the record to the vehicle's service history.
Need more help?
You can always ask an expert at the eAutoclub.com Support Desk, give us a call on out support number (310) 984-3501 xt 4, or suggest a new feature or improvement by emailing us at support@eAutoclub.com.
Related Articles
Adding to auto repair service history or recommended services manually
Click here to learn how to use the Add Record toolHow to Add or Modify a Targeted Marketing Campaign's Filter
This article explains how to add or modify filters for any marketing campaigns for Service Intel. It's important to note that while this tutorial specifically edits the Thank You emails, you can use these steps to modify any of the marketing in SI. ...How to Add a User Account
This article covers how to add a new user account in Service Intelligence. STEP-BY-STEP FOR THE CLOUD-BASED APPLICATION 1. Left click the gear icon and select User Settings from the drop-down menu. 2. In Users and Roles, click Add Users to Role. 3. ...How to Add, Remove, Change Filters
About: The Filter feature in SI is a powerful method of sorting your customers into specific groups. All tabs of the SI application allow you to use filtering including the Point of Sale tab, the Targeted Marketing Promotions tab, the Customer ...How to Add, Remove, or Change a Shop Logo
About: A shop logo allows you to include your own brand with the ServiceIntelligence reports, emails, and postcards. In order to add a Logo you need to have the image file located on the machine or on a shared network drive that SI has access to. ...